Hybridizer HOWTO – My First Project

Hybridizer is a compiler that lets you run a single version of your C# or Java code on any harware.
In this tutorial, we will explain how to create a first project in C# targeting GPU. We will illustrate with hybridizer essentials.

Warning/Disclaimer

We don’t support the entire C# language or .Net Framework. Main known limitations are:

  • Heap allocation (new A()) from device thread (except for arrays)
  • System.Collection is not supported
  • string type is not supported

Prerequisites

Software

You first need to install the following software:

  • Visual Studio 2012, 2013, 2015 or 2017. Warning, in Visual Studio 2017 with CUDA 9.2 or earlier you need to install v140 toolset from Visual Studio Installer.
  • Ensure your Visual installation supports C++ and not just C#.
  • CUDA toolkit 8.0, 9.0, 9.1, 9.2 or 10.0
  • Any version of the Hybridizer, including the free version, Hybridizer Essentials

License

You need to request a Hybridizer Subscription.
Subscriptions are our new licensing model for Hybridizer Essentials. They can migrate from one machine to another (only one machine being authorized at a time).
Trial are unique and attached to your email address, while you can purchase as many commercial subscriptions as you want.
Either you already purchased one, or you can request a trial for Hybridizer Essentials. To do that, click on Hybridizer->License Settings in Visual Studio:

hybridizer configuration

If you opted for the trial, provide you email address and click Subscribe:

hybridizer license settings

You should receive your license in your mailbox soon. If not, please contact us or create an issue on github.

Open your mailbox, and select the license text as follow:

hybridizer license mail

Paste this text in the license textbox in Hybridizer Configuration, and click Refresh License.

Hybridizer should validate the subscription, assign a license to your machine, and tell you the following:

hybridizer valid license

First project

You have two options:

Brand new project

From Visual Studio, click File, New, Project. Choose C#, Altimesh:

project template

Build C# project, then native generated project, and run.

From existing C# project

First create or open and existing C# console application.

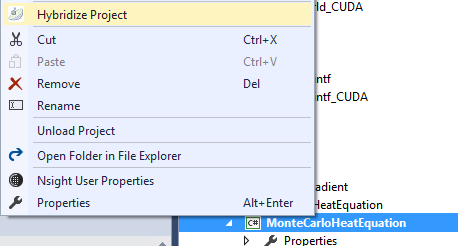
Right click on the project in the solution explorer, and select “Hybridize Project”:

This step will create a native CUDA project and add it your solution. It will handle the files generated by Hybridizer from your managed C# project.

Fill the requested fields and click “Generate”:

create-satellite-project

If everything worked correctly, several things happened in the background:

  • Your C# project now references Hybridizer.Runtime.CUDAImports. This assembly provides all the necessary attributes to hybridize methods, a CUDA wrapper, and a memory marshaller. We will come back on those in later posts.
  • A native project has been created and added to your solution. This project references two files, hybridizer.generated.cpp and hybridizer.wrappers.cu. The first one will contain a cubin module. The second will export native symbols.
  • If not already existing, an x64 platform configuration has been added to your solution.

Before building anything, change configuration to x64. 32 bit support is indeed being deprecated by NVIDIA, and nvrtc requires 64 bits.

Create a kernel

In your main class, add the following code:

        [EntryPoint]
        public static void Hello()
        {
            Console.Out.Write("Hello from GPU");
        }

The EntryPoint attribute tells the hybridizer to generate a CUDA kernel, as if you wrote:

__global__ void Hello() {
    printf("Hello from GPU\n");
}

You can now build the C# project, and the the satellite project. You can inspect generated file to see what hybridizer generated:

  • hybridizer.generated.cpp contains a big array of bytes, which is the device code of your kernel.
  • hybridizer.wrappers.cu exports a symbol:
    extern "C" DLL_PUBLIC int ConsoleApplication3x46Programx46Hello_ExternCWrapper_CUDA(...)
    {
    	CUresult cures ;                                                                                 
    	if (__hybridizer__gs_module.module_data == 0)                                                    
    	{                                                                                              
    		cures = cuModuleLoadData (&(__hybridizer__gs_module.module), __hybridizer_cubin_module_data) ; 
    		if (cures != CUDA_SUCCESS) return (int)cures ;                                                 
    	}                                                                                              
    	                                                                                                 
    	CUfunction __hybridizer__cufunc ;                                                                
    	                                                                                                 
    	cures = cuModuleGetFunction (&__hybridizer__cufunc, __hybridizer__gs_module.module, "ConsoleApplication3x46Programx46Hello") ;   
    	if (cures != CUDA_SUCCESS) return (int)cures ;                                                   
    	  // more generated code ...                                                                                                                                             
    	cures = cuLaunchKernel (__hybridizer__cufunc, ...) ; 
    	if (cures != CUDA_SUCCESS) return (int)cures ; 
    	int cudaLaunchRes = (int)::cudaPeekAtLastError ();                                                                                                     
    	if (cudaLaunchRes != 0) return cudaLaunchRes;                                                                                                          
    	int __synchronizeRes = (int)::cudaDeviceSynchronize () ;                                                                                               
    	return __synchronizeRes ;                                                                                                                              
    
    }
    

Run it

In your main method, add the following boilerplate code:


        static void Main(string[] args)
        {
            cuda.DeviceSynchronize();
            HybRunner runner = HybRunner.Cuda("ConsoleApplication3_CUDA.vs2015.dll").SetDistrib(1, 2);
            runner.Wrap(new Program()).Hello();
        }

with the appropriate generated dll name. This code:

  • registers the generated dll as a CUDA dll: HybRunner.Cuda(“ConsoleApplication3_CUDA.vs2015.dll”)
  • configure kernels calls to run with 1 block of 2 threads: SetDistrib(1, 2)
  • registers the current object as a kernel container: runner.Wrap(new Program())
  • runs the generated method.

Then run:

hello from gpu

Congratulations! You just successfully ran your first C# kernel on the GPU!

IBM Power 8

IBM announced at HotChip 2013 conference the latest generation of Power processor, the IBM Power 8. Altimesh plans to implement support for that Power processor for the Hybridizer. We present here early results of our first experiments on a sample of Power 8 processor. Results have been obtained in the technology center of Montpellier, with remote access to a Power 8 machine. Within a few days of experiment, we have been able to achieve between 75 and 83% of usage of peak compute performance and bandwidth performance, with an estimated of 80% usage for a computational finance use-case.

Experiments context

We have been given access to a system equipped with Power 8 processors at the Montpellier technology center. The system we had access to holds two 4.116 GHz Power 8 chips, with 12 cores each, and all the memory banks filled. SMT 8 has been activated, and virtual cores (counting up to 2*12*8 = 192) are further referred-to as cores.

We experimented hand-written code, with a linux operating system. We used GCC 4.8.2 20140120 (Red Hat 4.8.2-12) compiler.

We study two performance indicators: compute and bandwidth.

Compute benchmark

For compute, we have two experiments: the first is a pure raw performance test which has no application in practice. It is based on the Whetstone benchmark. The second is inspired from a real use-case where we implement an approximation of expm1 function using Taylor series approximation.

Whetstone

For this Whetstone derivative, we run a very large number of iterations on a small set of input values (256 times the number of cores), to account for a maximum usage of the system. The pseudo-code is the following:

double Whet (int N, double ix1, double ix2, 
                    double ix3, double ix4, double t)
{
            double x1 = ix1 ;
            double x2 = ix2 ;
            double x3 = ix3 ;
            double x4 = ix4 ;
            double xx ;
            for (int j = 0 ; j < N ; ++j)
       {
             xx = x3 - x4 ;
             x1 = (x1 + x2 + xx) * t ;
             x2 = (x1 + x2 - xx) * t ;
             xx = x1 - x2 ;
             x3 = (x3 + x4 + xx) * t ;
             x4 = (x3 + x4 - xx) * t ;
       }

       return x1 + x2 + x3 + x4 ;
}

Each iteration accounts for 14 floating-point operations: 10 add or subs and 4 multiplies. Note that these algorithms cannot benefit from fused multiply-add.

Expm1

For this experiment, we also use a large multiple of the number of cores, and iterate the operation twelve times to ensure we are compute bound with respect to global memory access.

The pseudo-code is the following:

double expm1(double x)
{
            return ((((((((((((((15.0 + x)
                * x + 210.0)
                * x + 2730.0)
                * x + 32760.0)
                * x + 360360.0)
                * x + 3603600.0)
                * x + 32432400.0)
                * x + 259459200.0)
                * x + 1816214400.0)
                * x + 10897286400.0)
                * x + 54486432000.0)
                * x + 217945728000.0)
                * x + 653837184000.0)
                * x + 1307674368000.0)
                * x * 7.6471637318198164759011319857881e-13;
}

Each iteration accounts for 1 add, 2 mul and 13 multiply-add.

Fused multiply add and GFLOPS

Some algorithms, such as our whetstone test and expm1 cannot inherently take benefit at 100% from the fused multiply-add. As a results, the obtained FLOPS cannot reach peak, not because of the system but rather of the algorithm. In order to best measure usage of the system, we verify the instructions we use in the assembly, and measure performances based on complex flops operations (CFLOPS), for which fused-multiply add is 1 CFLOP, since the Power 8 can achieve this instruction at the same throughput as a mul or add.

The Power 8 processor has various vector and scalar units. We assume that the design of execution pipes is similar to the design of Power 7: Reading [1], we can see that at core has two execution pipes, each of which can perform a complex FLOP in one cycle. This holds for a total of 4 double precision multiply-adds per cycle per core. For two 4.116 GHz Power 8 with 12 cores each, this results in 395.136 GCFLOPS (here, 1G=1e9).

We ran the tests 20 times, and took the best run.

For the Whetstone test, we present a single test configuration which is the best we could achieve (actually, the code generated has the best configuration – no copy to memory at any point, but obviously instruction dependency). For the expm1 test, we used different code constructs and present the best obtained result in the above table.

Optimization flags for g++-4.8: -O3 -mvsx -maltivec –fopenmp -mtune=power8 -mcpu=power8 -mpower8-vector

Test Peak GFLOPS GCFLOPS ratio
Whetstone 395.14 326.86 326.86 82.7%
Expm1 – double 395.14 540.03 297.94 75.4%
Expm1 – single 790.28 1041.51 574.63 72.7%

Bandwidth Test

We achieved three bandwidth tests, inspired from stream benchmark [2]. One is read-only, another is accumulation (two reads, one write in same page); the last one is copy (one read and one write in different page).

The hardware platform we tested had its bank filled with an announced peak of 368 GB/s: 256 GB/s for read, and 128 GB/s for write.

In this section, since we use GHz to compute bandwidth, we use 10^9 bytes/s = 1 GB/s.

Read test

The read test is the sum of all elements within a vector. Since the nineties, the compute performance has outperformed the bandwidth performance, the summation of all the elements within a vector is memory bound.

Read/Write in place

This test is a read-write in place: the same page is used for read and for write. In this test, we will focus on aggregated bandwidth and split bandwidth, that is: is it possible to perform a read and a write operation within the same cycle.

Copy

This last test is a copy test which performs two reads in one place, and a write in another location. This test, in conjunction with the Read/Write in place will help us understand the behavior of the cache system.

Test T R W Read time Write time ratio
Read 0.004759638 1 0 0.00390625 0 82%
R/W (in place) 0.01162115 2 1 0.0078125 0.0078125 67%
R/W (copy) 0.01635323 3 1 0.01171875 0.0078125 72%

The measured read bandwidth is 210.1 GB/s, which is 82% utilization of the peak. Obtaining such performance with a naïve implementation is very satisfactory (note: we needed to dispatch memory given CPU affinity on OpenMP threads to achieve such performances on a multi-processor system).

The Read/Write in place makes use of 67%; hence our assumption on the concurrent read-write is valid. We need to read twice as much data as we can write. However, it seems that we need a better understanding of the implementation of the paging system and cache invalidation to hide latency induced by the cache misses. Maybe some form of prefetching would benefit the system.

The final test proves that we need to load a page before being able to write to it, for cache consistency.

None of these test experimented transactional memory or any other related feature. That could be a further experiment.

System

-S824 24 POWER8 cores %40 4.1 GHz
-Fully populated DDR3 memory banks
-8 threads per core
-RedHat Linux operating system
-Open Source gcc compiler

NVIDIA Kepler

The Kepler K20[1] is made of SMX, which can be closest compared to CPU cores. Each SMX has its own cache, instruction dispatching units, memory interface. Kepler SMX (counting 14 on K20X) holds 192 single precision floating-point units, each of which can do a multiply-add in a single cycle (732MHz for the clock of the K20X). As a result, the announced peak performance is 3.95 Tflops. It also holds 64 double precision floating-point units, with same instruction throughput, announcing 1.31 Tflops.

Work distribution on a Kepler is organized in warps of 32 entries. Each thread within the same warp doing the same operation, with potential skipping, we can risk an analogy to CPU vector units (current AVX systems having 8 single precision entries). Each SMX has four Warp Schedulers with two Dispatch units each. Each warp can schedule up to two instructions per cycle[2].

Each SMX can run several contexts at the same time. This context distribution is somehow flexible, but is best performed if instructions are the same (note the single instruction cache per SMX). The total number of “threads” ran at the same time is up to 2048, that would count for 64 warps at the same time. Hiding latency of some operations (such as access to memory) requires a maximization of warps active at the same time.

Note the number of registers available is 2Mbits for each SMX, for a rough total of 26 Mbits for a K20c. This large register file has to be shared amongst the active warps, narrowing it down to 1024 bits per entry; that is 32 registers of 32 bits.

Memory bound or compute bound

One of the metrics we analyse is the ratio between compute raw performance and memory bandwidth. This provides, as an asymptotic behaviour, the number of operations that can be performed per memory operation. It helps defining the limit between memory-bound and compute-bound problems.

Chip Bandwidth Single Precision Ratio Double Precision Ratio
K20C 208 3519 67.7 1173 45.1
K20X 250 3951 63.2 1317 42.1
K40 288 4291 59.6 1430 39.7

Bandwidth benchmark

We analyse the read bandwidth of the architecture, with two tests: ECC and no-ECC, depending on the criticity of the reliability of the memory.

Chip Peak ECC Ratio No-ECC Ratio
K20C 208 154.30 74.2% 184.99 88.9%
K20X 250 182.68 73.2 220.12 88.2%
K40 288 192.65 68.6% 217.29 81.0%

Note on madd and GFLOPS

Not every algorithm can make full use of the madd operation. In this document, we rather consider madd as another floating-point operation kind. Most architectures have one-cycle madd, or at least same cycle-count than add or mul; we thus consider it as a single flop. In that concern, the raw compute power of hardware is halved compared to marketing figures. Algorithms reconstructing multiply-add instructions based on evaluation graph are well spread in compilers.

Compute benchmark

For this benchmark, we use a Taylor expansion of the expm1 function. We know the number of operations, and no branching occurs.

Nvidia Kepler

On Kepler, there are 4 warp schedulers and 6 warp instruction units. Hence using more than 66.6% of the hardware requires the usage of Instruction Level Parallelism (ILP). This feature is not available programmatically, we rather need to provide the compiler and driver with opportunities to use it.

Chip Peak (SP) Single Precision ratio Peak (DP) Double Precision ratio
K20C 1760 1418 80.6% 586 540 92.2%
K20X 1968 1599 81.3% 656 591 90.1%
K40 2146 1608 74.9% 715 632 88.4%

Memory-Compute limit revisited

We finally revisit the first metric, with the achieved performances.

Chip Bandwidth Single Precision Ratio Double Precision Ratio
K20C 154.30 1418 37 540 28
K20X 182.68 1599 35 591 26
K40 197.65 1608 33 632 26

[2] “Furthermore, some degree of ILP in conjuction with TLP is required by Kepler GPUs in order to approach peak performance, since SMX’s warp scheduler issues one or two independent instructions from each of four warps per clock.” – from Kepler Tunig Guide

Intel Xeon PHI

The Intel Xeon PHI is an implementation of the MIC (Many Integrated Core) architecture.

It holds several independent cores (61 in our setup), with 512 bits vector units[1]. Each core is hyper-threaded with up to four threads. Vector operations are very similar to SSE or AVX, yet much more complete. Moreover the new gather and scatter operations ease the vector access to memory performing a lookup in a single instruction.

Memory bound or compute bound

One of the metrics we analyse is the ratio between compute raw performance and memory bandwidth. This provides, as an asymptotic behaviour, the number of operations that can be performed per memory operation. It helps defining the limit between memory-bound and compute-bound problems.

Chip Bandwidth Single Precision ratio Double Precision ratio
SE10P 352 2130 24.2 1065 24.2

Bandwidth benchmark

We analyse the read bandwidth of the architecture (intel xeon phi), with two tests: ECC and no-ECC, depending on the criticity of the reliability of the memory.

Chip Peak ECC ratio No-ECC ratio
SE10P 352 162.08 46.0% 168.04 47.9%

Note on madd and GFLOPS

Not every algorithm can make full use of the madd operation. In this document, we rather consider madd as another floating-point operation kind. Most architectures have one-cycle madd, or at least same cycle-count than add or mul; we thus consider it as a single flop. In that concern, the raw compute power of hardware is halved compared to marketing figures. Algorithms reconstructing multiply-add instructions based on evaluation graph are well spread in compilers.

Compute benchmark

For this benchmark, we use a Taylor expansion of the expm1 function. We know the number of operations, and no branching occurs.

Chip Peak (SP) Single Precision ratio Peak (DP) Double Precision ratio
SE10P 1065 879 82.5% 533 440 82.5%

Memory-Compute limit revisited

We finally revisit the first metric, with the achieved performances.

Chip Bandwidth Single Precision ratio Double Precision ratio
SE10P 168.02 879 22 440 22